Monday, September 14, 2009

Getting my hands dirty in the name of cheapness.

I made my weekly trip to The Italian Market for fruits and veggies on Saturday. I like to spend an afternoon each weekend at the market, making up a weekly menu as I go, and buy all the fruits and veggies that I am going to need at once. I save a lot of money this way, by getting things in bulk (i.e. I buy a bag of onions once a week, instead of an onion every day. Yes, I eat at least an onion a day) and also by catering my shopping to what is freshest and cheapest. I know that this sounds like a serious time investment that can suck up some of our already precious time off, and it kind of is, but once you get used to (and good at) it, it doesn't take too long at all. I have also found that this is one of my favorite parts of the week.

Back to my story though. I was at the market looking through all the different produce stalls, and I came across a farmer that was selling big Jersey Fresh tomatoes 5 for $1. This kind of deal is exactly why I love going to the market. Of course I did have to dig through big baskets of broken and moldy tomatoes to find good ones, but I am not above getting my hands dirty. I found 20 perfectly delicious ripe tomatoes with just a little effort, and brought them home with the rest of my weekly bounty. Why would I want 20 tomatoes that were perfectly ripe and would be bad within a few days? I'll tell you why Fresh Tomato Sauce!! If you remember, at the bottom of my tomato sauce post I included a variation for making sauce from fresh tomatoes. I believe I mentioned how this will result in face meltingly delicious sauce. I know that I already posted about this, but I figured I don't make very many picture posts, and that this is the sort of thing that is enough of a pain in the ass, that it is nice to see it done once before trying to tackle it on your own.

So then let's get started. I got home from the market, put a large stock pot of water on the stove to boil, washed my kitchen sink, and then filled it with tomatoes and cold water. I made sure to get my hands on each tomato and give it a good scrubbing with a clean dish cloth. I didn't take a picture of that step, but here is my wok (aka the largest bowl I own) with 20 nice clean tomatoes in it.


Once the tomatoes were all cleaned, I set to the task of removing all of the stem/core spots and cutting a very shallow X on the bottom of each one. I then added them to the boiling water 5 at a time, let them hang out there for 30ish seconds, and then moved them to an ice water bath for a few minutes. After the tomatoes cool, the skins are nice and easy to peel off.


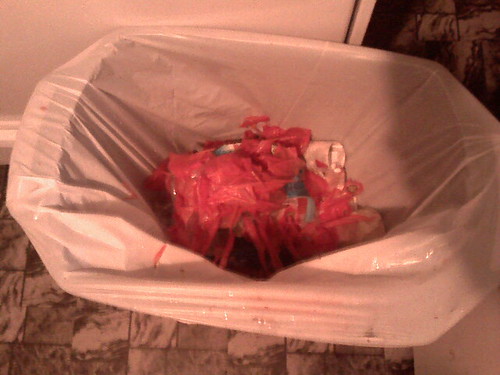
The skins of my boiled enemies.


My least favorite part of the whole deal is seeding the tomatoes. It is kind of a pain in the ass, but I just put on good music and keep mentally reminding myself how good the sauce is going to be. Each tomato gets cut in half, perpendicular to the stem line. Then I use a butter knife to scoop out all of the guts.


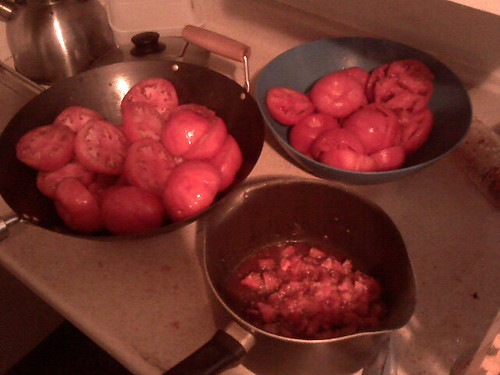
Make sure to save all the guts so that you can strain the juice out of them, and add it back into the tomatoes. I mean you could just throw them out if you were a no good, lazy, food waster.


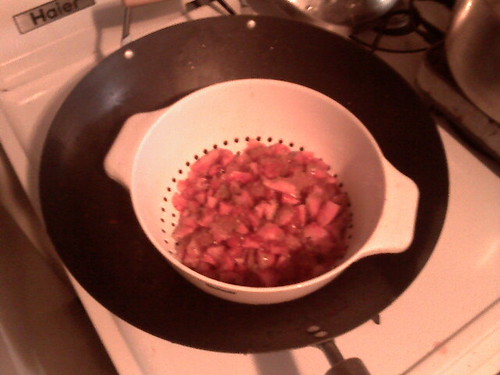
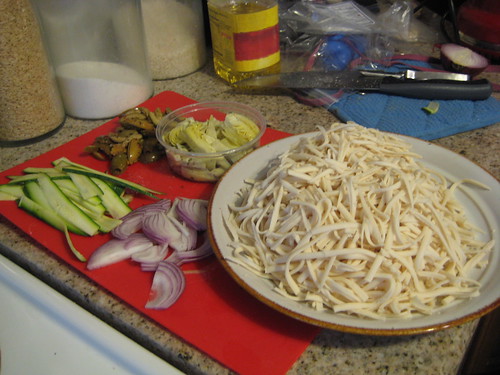
Once you have all the tomatoes gutted, you are going to need to chop them up. I try to chop them as small as I can without making it take forever. Once they are all chopped, I use my hands to smash them up as much as I can. This part is fun, just wash your hands, stick them in the bowl and squeeze the chopped tomatoes in your fists over and over until they are good and smashed up. This is what 20 prepared tomatoes looks like.


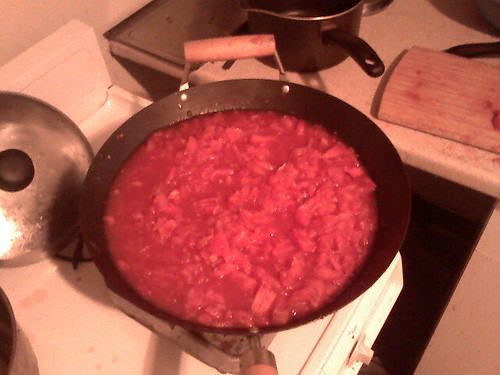
The hard part is now over. All you have to do is have an afternoon to commit to babysitting your sauce while it boils away. I was just reading through my original instructions and feel like there are a few things that should be added.

1. You are going to want to let the sauce come to a boil over high heat, and let it boil for about half an hour, then turn it down to med and let it simmer all damned day. Be sure to stir it occasionally.

2. If you don't like your sauce too chunky, you can wait until it is done, and then runn it through the blender.


I also took pictures of most of the cooking process, but then I decided that it is probably over kill to post them all. You all know what a diced onion looks like. Also, the picture quality isn't so great, since I didn't have my good camera with me and took all of the photos with my cell phone. If you really want to see the whole deal though, you can find them on my flickr

Tuesday, August 11, 2009

Giant zucchini are good for things other than dirty jokes.

Summer is rolling along, and we are getting close to that time of year when every back yard garden and farmer's market will be full of zucchini and summer squash, some of which will be monstrous in size. These monster zucchinis were one of my favorite things when I was a kid. Part of that is because I always love eating zucchini, part of that is because a zucchini the size of a baseball bat is really cool looking, and mostly it is because my grandmother uses those huge zukes to make stuffed zucchini, which is just delicious.

A few years ago, my friends and I stumbled across some of these giant zukes at a farmers market for like a dollar a piece. I immediately ran up and grabbed one shouting, "Yo, let's stuff these mother fuckers." none of my friends had any clue what I was talking about, other than the ones that thought I was making a dirty joke. I guess I had assumed that since my grandmother made them, and they were so delicious, that everyone would make stuffed zucchini. I appear to have been wrong. My friend Pete did say that it sounded similar to a Middle Eastern dish, but I can't remember the name of it.

That day, I made it my mission to work out a vegan version of my grandma's stuffed zucchini, that I loved so much. It took a couple of shots, but I like to think that I now have it pretty much nailed. My grandmother's original version was basically sweet Italian sausage, tomatoes, and rice, topped with melted cheese and bread crumbs. I have found that you can match that pretty closely using TVP, seitan or veggie burger crumbles, with the right spices. I use TVP because it is getting really easy to find(you can get it at most grocery stores now) and it is pretty cheap. The cheese and breadcrumb topping is not essential, but is damned tasty, so if you have a hard time finding either of them vegan, just leave em out, and you will still have a fine meal.

p.s. This recipe makes like 15 servings, so make it for a party, or be prepared to eat it for a week. Either way it is tasty enough to be a success. You can cut the recipe in half and use smaller zucchinis, but I prefer the giant zukes. There isn't really a taste difference in the zucchini, but the ratio of stuffing to zuke is better balanced in the larger guys.

Grandma Davies' Stuffed Giant Zucchini (veganized)

Ingredients
1 - Gigantic zucchini (zukes about a foot and a half long and as big around as a softball are ideal)
2 cups - short grain rice (cooked as per the instructions on the package)
1 - 28 oz. can peeled chopped plum tomatoes, drained (I would save the liquid for veggie stock)
1 1/2 cups - Re-hydrated TVP crumbles (or 2 cups thawed frozen veggie burger crumbles)
1 - med onion, minced
10 oz. - Vegan Mozzarella, shredded (my favorites are Follow Your Heart Vegan Gourmet and Chicago Soy Dairy Teese)
1/4 cup vegan bread crumbs
6 - cloves garlic, minced
1/2 tsp - Thyme
1/2 tsp oregano
1/2 tsp rosemary leaves
1/2 tbsp fennel seeds
1/2 tbsp salt
1 tbsp - cooking oil

Equipment
2 - med sauce pots
1 - large cookie sheet
1 - large salad bowl
1 - food processor or blender (non-essential)
knife, cutting board, etc...

Cooking
  • In a medium sauce pot, prepare the rice as per the directions on the package.
  • Put the onions, garlic, salt and oil in the other sauce pot over medium heat, stirring frequently.
  • In your blender or food processor pulse all of the spices until they are roughly broken up. If you don't have a blender or processor, just put the spices on your cutting board and chop them with a chefs knife. It will work just fine but take a lot longer.
  • Once the onions become translucent add the spices and continue to sautee for about a minute.
  • Add the TVP (or veggie burger) and tomatoes and continue to stir frequently until it comes to a boil. (This by it's self is an awesome pasta sauce.)
  • Once the rice is finished, combine the rice and sauce in your salad bowl and set aside to cool.
  • Cut your monster zuke in half length wise and trim the ends just enough to remove the stem spot. Be careful with your trimming, because we need to preserve the integrity of the vessel.
  • Using a large spoon, scoop out all the seeds and guts. I would say that you should save this for stock or compost, but it is worthless in stock, and will turn your compost into a zucchini farm, so you should just get rid of it.
  • Use a fork to poke a bunch of holes all over the inside and outside of the zucchini pieces.
  • Rub the outside of the zucchini with a little oil and arrange the two halves on the cookie sheet.
  • If the zucchini halves are unstable, use wadded up tinfoil to steady them.
  • The filling doesn't have to be all the way down to room temperature before you stuff, but you should let it cool enough to thicken up well. This will make it easier to create a nice mound.
  • Stuff each side with enough filling to make a mound about and inch and a half above the top of the vessel. (You will probably have a little leftover, maybe more depending on your zuke size. You can just eat it by it's self, or it freezes pretty well, and can be used to stuff peppers, squash flowers (now that is a recipe I might have to blog soon!) or lots of other veggies.)
  • Place the stuffed zukes into a 350 degree oven for about 20 minutes, testing with a fork every few minutes after you pass the 10 minute mark. The cooking time is going to change a lot based on how cool the stuffing was and how thick the zuke walls are.
  • Once the flesh is still firm, but you can poke into it without too much resistance, take them out and turn your oven up to broil, or the hottest setting it has.
  • Give each side of the zuke a nice coating of soy cheese and then an even dusting of bread crumbs.
  • Put the zukes back under the broiler and watch them closely until the cheese is nice and melty.
  • Be careful because soy cheese doesn't like to melt, so your bread crumbs might start to over brown before the cheese looks really melted. If that is the case just go ahead and take them out, they will be perfect.
Alternate Version
Don't like fake meats? Try using 1 1/2 cups dry brown lentils, prepared as per the package's instructions, in place of the TVP. It will still taste great, the rice/legume combo is a great source of protein, and it will make this dish totally gluten free.


Wednesday, July 22, 2009

Upcycled food

I am notoriously not into leftovers. I guess the thing is that I like cooking more than I like eating, so I would usually rather make myself something new, than eat something that is sitting in my fridge. Obviously things like work lunch and the odd super busy day at home will make me eat leftovers, but I avoid it whenever I can. This does not mean that I will not use my leftover food, but that I will not simply reheat it and eat it again. I love to use leftovers as ingredients in new food.

For example, let's talk about that Alfredo Sauce that I posted the other day. I don't usually have leftovers of my Alfredo, since people love that stuff, but when I do, I always reuse it as an ingredient in other food. Like I said in the Alfredo post, it is great on veggies, awesome to dip stuff in, and makes a fine addition to a grilled sammich. My favorite thing to do with left over Alfredo Sauce though, is make Cream of Broccoli Soup. I have always loved broccoli soup and this version is not only tasty, but super quick and easy to make.

Cream of Broccoli Soup

Ingredients
1 cup Vegan Alfredo Sauce (that is about half of my recipe, so if you don't have leftovers, you can just make a half batch)
2 cups Vegan Veggie Stock
1 largish carrot minced
2 stalks of celery minced
1 cup chopped broccoli (I usually just use frozen stuff since we are going to be cooking it into soup anyway.)
1 Tbsp cooking oil

Equipment
1 med - large sauce pot
knife, cutting board, etc...

Cooking
  • Add the carrots, celery and oil to the pot over med high heat and sautee until they start to soften
  • Add the sauce, stock and broccoli(if it is frozen, if fresh add with the carrots and celery) and bring to a simmer, try to avoid boiling (you might need to turn the heat down a little)
  • Simmer for 15 - 20 minutes


Tuesday, July 21, 2009

I Once Knew a White Dog Named Alfredo

I have been on a kind of a Tex-Mex kick for a while, but if left dormant for long enough, my love or Italian Food will always show back up eventually. In particular, my love of pasta will not be denied. I swear, it's the best thing we whiteys ever stole from Asia. Considering my love of all things pasta, I figured it would be cool to start posting some non tomato based sauces to go along with my massive marinara post. I am starting with Alfredo, because pretty much every time I serve it, I get begged for the recipe. Until recently, I just told people to thicken some seasoned soymilk with flour (which is basically what I do) but I have been realizing that not everyone is going to be able to take that and run with it. So I have been paying more attention to what I am actually doing, the last few times that I made it, and this recipe is the result of that.

Alfredo sauce, as Americans know it, is really a bastardization of an Italian dish, rather than a direct translation. The Italian original was basically just cheese and pasta, with a little butter or cream to thin it out. The Americanized version is really more similar to a Mornay sauce, but this is all just my food nerdy rambling. We all are probably thinking of a very similar thing when I say Alfredo Sauce, and who cares if it is traditional, if it tastes good and we can make it vegan.

This Alfredo Recipe is awesomely thick and creamy, even in the absence of dairy, and packed full of garlic, since mostly everything I cook is packed full of garlic. If you are less into scarring vampires than I am, feel free to use less, but don't be shocked when you figure out that it is way tastier my way. I love it in the more traditional ways, i.e. on some serious, chunky pasta, but I also love it on just about everything. It kicks ass on steamed veggies, I will dip pretzels or other snack chips in it, and just the other day, I made an awesome paninni with left over Alfredo, tomatoes and mushrooms.

Alfredo Sauce

Ingredients:
1/2 med onion, minced
1/2 head of garlic, minced
1/2 tbsp Italian seasoning
1 - 2 tsp salt (to taste)
3 tbsp flour
3 tbsp nutritional yeast
1 pint(16floz) soy milk
oil

Equipment:
1 - sauce pan
Knife, cutting board, etc...

Cooking:
  • Sautee the garlic, onion, seasoning and salt over high heat in enough oil that there is a few tbsps of loose oil in the pan.
  • Once the onions and garlic are soft and translucent, sprinkle the flour in a little at a time, the goal being to make a thin paste, not a dough.
  • turn heat down to medium and continue to cook the flour for 10ish minutes until it turns a blond/brown color
  • add the soy milk and nutritional yeast and stir constantly as the sauce thickens, until you start to see peaks and ridges stay in the surface of the sauce (or until it reaches your desired thickness.) DO NOT LET SAUCE BOIL
  • If the sauce becomes too thick, you can add a little of your pasta water to it, to thin it down, before serving.

Wednesday, July 15, 2009

The Triumphant Return, see also: ArtieKGB Triumphs over Laziness and Procrastination, see also: Hell Yes, Chili!

So, no excuses offered. I just kind of dropped the ball mid way through my Cinco De Mayo project. I was trying to go back to that, but it is pretty out of date at this point, so I am just going to move on. Trust me, I love Mexican food enough, that I am definitely going to circle back around.

Today, I want to talk about Chili. I absolutely adore a nice hot (temp and spice) bowl of chili. I would suppose you can lump this in with one of ArtieKGB's tenets of cooking, "Tomato + garlic + fat + salt = delicious." There are no doubts about it though (unless you are a crazy person) chili is delicious.

I have been playing with my chili recipe for a few years, and it definitely caters to my preferences as far as flavors. In addition to my already stated tomato+garlic+fat fixation, I am also a huge fan of spicy food, and all things roasted and caramelized. This recipe works all of these things into one great pot of awesome. If you are lazy and in a hurry, you can skip or change a lot of the steps, but in the end, your chili will be no where near as good.


Chili the way Artie likes it

Ingredients

1 - 19oz can red kidney beans
2 - 19oz cans crushed tomatoes
Seranno peppers to taste, finely minced (I use 10, but I like things really spicy)
5 - cloves garlic, finely minced
1 - med yellow onion chopped
2 - zucchini cut in 1/2 inch cubes
2 - large carrots cut in 1/2 slices
1 - ear corn on the cob
1 - large bell pepper chopped
vegetable oil
1 tbsp - Salt
2 - tbsp table sugar
1 tbsp - ground cumin
2 tsps - ground oregano

Equipment

1 - large sauce or stock pot
1 - cookie sheet
knife, cutting board, etc.


Cooking
  • · Cut all the corn off of the cob and spread the corn and chopped bell pepper on a cookie sheet.
  • · Put the cookie sheet under a broiler and watch closely until the veggies begin to blacken. You want some solid roasting, but don't make charcoal.
  • · After removing from the broiler, set the corn and peppers aside to cool.
  • · Put the onions, garlic, serranos, oil and salt in a large sauce pan, over medium high heat, and sautee until the onions become translucent.
  • · Add the cumin and oregano and reduce the heat to med.
  • · Continue to sautee, stirring regularly until the onions have cooked out all of their water and turn a nice golden to dark brown. Be careful not to let them burn.
  • · Add the beans, zucchini, carrots, corn and bell peppers and a little more oil
  • · Continue to sautee until the veggies begin to soften
  • · Add the tomatoes and sugar
  • · Allow the chili to come back to a simmer
  • · Turn the heat down until the pot is just barely simmering
  • · Stir regularly for the next 30 minutes to an hour.

The easy but not quite as tasty way
  • · Sautee the onions, garlic, serranos until the onions are translucent
  • · Combine all ingredients in a crock pot on medium low and leave it to cook while you are at work.

Wednesday, April 15, 2009

More Cinco De Mayo action, toppings.

Over the next few weeks, I plan to post my favorite main dishes for Cinco De Mayo, but first I wanted to post just a few more tasty toppings that I like to have on the table for any taco night.

Tex Mex Pickles

Brine
1 cup - white vinegar
4 Tbsp - sugar
1/4 tsp - salt (you can just use a fat pinch)
1 - dried Serrano (Chile Seco) or other small dried chile (if you like the spice use 2 or 3)
1 tsp - cumin seeds

Equipment
You are going to be boiling vinegar, so you need a pot that wont react with it. That means stainless steel, glass or enameled. If you use a copper or iron pot, it will make the pickles taste funny.
1 - clean jar to store the pickles in. I like to use old pickle or jelly jars.
Knife, cutting board, etc...

This same brine is great for lots of different pickles. Here are my favorite 3.

Red Onion
  • Get the biggest red onion you can find.
  • Peel the onion and cut a small slice off of one side, so that it will be stable when resting on the cutting board.
  • Cut the onion into 1/4 inch thick rings.
  • Bring all brine ingredients to a boil
  • Add the sliced onion and boil for just a few seconds, while you give it 10 or so stirs.
  • Remove the pan from the heat and let it cool completely before transferring your pickles to a left over pickle or jelly jar.
  • Use the left over brine to make sure that all the pickles in the jar are totally covered.

Jalapeno
  • Core and seed 6 large jalapeños and cut them into 1/4 inch rings
  • Bring all brine ingredients to a boil
  • Add the sliced jalapeños and boil for just a few seconds, while you give them 10 or so stirs.
  • Remove the pan from the heat and let it cool completely before transferring your pickles to a left over pickle or jelly jar.
  • Use the left over brine to make sure that all the pickles in the jar are totally covered.

Red Cabage
  • This recipe will need about twice as much brine as the other two, so make a double batch.
  • Use one small head of red cabbage
  • Cut the cabbage as thinly as you can, like you were making cole slaw.
  • Bring all brine ingredients to a boil
  • Add the cabbage and boil for just a few seconds, while you give it 10 or so stirs.
  • Remove the pan from the heat and let it cool completely before transferring your pickles to a left over pickle or jelly jar.
  • Use the left over brine to make sure that all the pickles in the jar are totally covered.


Soyur Cream

Ingredients
1 pound - firm tofu
4 tbsp - lemon juice
3 tbsp - cider vinegar
4 tbsp - vegetable oil
1/4 tsp - dry mustard powder

Equipment
You really need a food processor for this. A blender will work in a pinch, but it isn't ideal.

  • Puree tofu, lemon juice and vinegar in a food processor until well combined
  • Sprinkle in mustard powder and let run for a minute until the powder is all well combined with the tofu mixture. (Make sure that the vinegar and lemon juice is well combined before adding the mustard. If there isn't enough acid in the mixture to neutralize it, the mustard will react and make this very spicy.)
  • Drizzle the oil in slowly allowing it to be incorporated a little at a time until all oil is well combined with the mixture
  • then let the processor run for another 20 minutes. This may seem like a long time, but it is the most important step, the longer you let this run, the more it breaks down the proteins in the tofu, and the smoother it will become.
  • If the mixture is still too thick after the mixing is finished add a very little bit of water at a time until it reaches the desired consistency. Be careful not to use too much water, you want just enough to make it right.
  • This will make about 2 cups of soyur cream.

Tuesday, April 14, 2009

BeBe Gourmet

My friend Corri writes a really cute food blog called BeBe Gourmet. It is a mix of recipes, reviews, and foody adventures. She recently posted a recipe for her Grandma's 3 Bean Salad. It looks really tasty, and vegan.

Check it out.

Sunday, April 12, 2009

The one Easter dish that I couldn't live without.

My family has always been really into having a big dinner on holidays. It doesn't really matter what one, New Years dinner is just as huge as Christmas. The important thing is that as many family members as possible get together, eat, tell stories, have a few drinks, enjoy each other's company and remember those of us who aren't still around. I suppose one of the reasons that I enjoy cooking and eating so much is that I was raised in a family where food is regarded as a type of fellowship.

Since today is Easter, I would imagine that while I sit in my apartment drinking coffee and typing, my family is sitting down to a huge dinner. Were I there, I am sure that my dad would have made me a large casserole dish of the one thing that I actually miss from Easter dinner, scalloped potatoes. Ham, I haven't really missed since I stopped eating it, but that other staple of Easter dinner (at least in my fam) I still adore and eat whenever I have the chance.

Scalloped Potatoes without ham

Ingredients
5 - russet potatoes peeled and thinly sliced
1 - onion, sliced as thinly as you can possibly manage.
4 Tbsp - flour
1/4 cup - vegan margarine
1 1/2 cups - unsweetened soy milk
2 Tbsp - Nutritional Yeast (if you have it, the recipe works fine without)
1 1/2 Tsp - salt
1/2 cup - shredded vegan soy cheese (Follow your heart is my favorite, again it will be fine without)
paprika
garlic powder
bacos (or other fake bacon bits)

Equipment
1 - sauce pot
1 - casserole dish
1 - cheese grater
1 - whisk (or a fork works in a pinch)
knife, cutting board, etc...

Cooking
  • Add your flour and margarine to your sauce pot, over medium heat.
  • Stir constantly with your whisk until the margarine is all melted and the mixture is smooth.
  • Add the soy milk, salt, and nutritional yeast and whisk frequently until the mixture just comes to a simmer.
  • Remove from heat
  • Using a little more of your margarine, grease the inside of the casserole dish.
  • Cover the bottom of the dish with an even layer of potato slices, two slices thick.
  • Cover the layer of potatoes with a very thin layer of onion slices, remember this is scalloped potatoes, not scalloped onions, too much will be over powering.
  • Sprinkle the top of the onion layer with just a very fine dusting of garlic, paprika and bacos. Remember, there are going to be a lot of layers, so just a tiny bit is needed.
  • Repeat layers, until the dish is half full
  • Pour half of your soy milk / flour mixture slowly over the top, letting it soak in.
  • Continue with potato, onion and seasoning layers until the dish is full.
  • Pour the remaining soy milk / flour mixture over dish
  • Cover the top with shredded soy cheese.
  • Bake for about an hour at 350.
  • You can test to see if it done by poking the middle with a fork. The potatoes should feel firm still, but shouldn't give too much resistance.
  • I like to finish it off with a few minutes under the broiler, if the cheese isn't all melted and slightly browned yet. I mentioned this before, in the pizza post, but soy cheese needs to be heated to astronomical temperatures to actually melt.
That's about it, but I did want to take a minute to talk about Nutritional Yeast. I know I said I wouldn't be including any hard to find or expensive ingredients in my recipes, but I have to go back on that in the case of Nutritional Yeast. Of course you can leave it out if you want, and the potatoes will still be delicious. Here is my case for including it though.

There is only one nutrient that a vegan can not get from vegetable sources, and that is B12. Up until about the industrial revolution, that didn't matter, because B12 was abundant in the water supply, due to natural bacteria. Today however, our water is so filtered and purified (which I have no problem with) that there is little to no B12 in it any longer. Fortunately, Nutritional Yeast, in addition to being tasty, is rich in vitamin B12. People with B12 deficiency may experience:
  • Numbness or tingling in the hands or feet
  • Insomnia
  • Loss of memory
  • Lack of balance
  • Depression
  • Digestive problems
  • Dizziness
  • Liver enlargement
  • Eye problems
  • Headaches
  • Hallucinations
  • Inflamed tongue
  • Breathing difficulties
  • Loss of memory
  • Palpitations
  • Neurological damage
  • Tinitus or ringing in the ears
You can find Nutritional Yeast flakes at any health food store, and they are popping up more and more often in traditional groceries, particularly those with health food or organic sections. It is sometimes a little pricey, but it isn't terrible and one container will go a long way.

Thursday, April 9, 2009

Cinco De Mayo, el primer curso. SALSA!

If there is a better appetizer/snack food than salsa, I am not sure what it is. As a matter of fact, I have become known for showing up to pretty much any gathering to which I am invited with at least one kind of salsa in hand. It is kind of my thing. I also never prepare a tex-mex meal without at least one or two salsas on the table.

I am not so adamant about avoiding jarred salsas, as I am about jarred pasta sauce. There are actually some really tasty pre-packaged salsas out there. This is where my "Do it your F-ing self" nature is going to kick in though. Even though there are some tasty salsa options on the shelf at the grocery store, why would I want to pay 5 or more dollars for a jar, when I can make something just as good in my own kitchen? I have included 3 of my favorite salsa recipes(black bean salsa, roasted poblano salsa and guacamole) here, to get your Cinco De Mayo feast started right.


Black Bean Salsa

Ingredients:
1 - 15.5oz can balck beans
1 - ear corn off the cob, sweet white corn is my favorite (or 3/4 cups frozen corn, thawed not cooked)
2 - plum tomatoes peeled, seeded and diced (check the Nona's 10 Hour Marinara recipe for peeling/seeding instructions)
1/2 - med onion minced
4 - cloves garlic minced
1 - jalapeño minced (more or less to taste)
1 - lime juiced
1 tsp - ground oregano
2 tsp - ground cumin
salt to taste (about 2 tsp)

Equipment:
1 - mixing bowl
1 - pan boiling water
1 - bowl ice water
Knife, cutting board, etc...

Cooking:

  • Mix all ingredients together and then refrigerate for at least an hour. Make it a day ahead of time if you can. It tastes much better after sitting overnight.


Roasted Tomato Poblano Salsa

Ingredients:
4 - large tomatoes
2 - poblano chiles (if you have a very low spice tollerance, you can use less but after roasting these wont be very spicy.)
1/2 - med onion minced
4 - cloves garlic minced
1 - lime juiced
1 tsp - powdered oregano
2 tsp - powdered cumin
salt to taste (about 2 tsp)

Equipment:
1 - mixing bowl
1 - barbecue grill
1 - bowl ice water
1 - container with tight lid
knife, chopping board, etc...

Cooking:
  • Start the grill up while you are chopping the veggies, and when it is good and hot, arrange all the peppers and tomatoes over the hottest part and leave them uncovered.
  • Turn them every 5 or so minutes until they are blackened all the way around.
  • Once the skins are all charred and blackened, put the peppers in a tupperwear or soup pot with a tight lid, and leave them covered for 5 - 10 minutes.
  • After you take them out, you should be able to easily scrape the skins off.
  • The tomatoes get transfered to an ice water bath for about 30 seconds during which I use my hands to brush off as much of the char as I can without destroying them too much.
  • After being skinned, the peppers and tomatoes both get chopped up and added to a large mixing bowl.
  • Add the rest of the ingredients and mix well.
  • Refrigerate for at least a half hour before eating, overnight is better.


Guacamole!

Ingredients:
3 - haas avecados diced
1 - plum tomato
1/2 - med onion
4 - cloves garlic minced
2 - limes juiced (I like mine limey, you might want to start with just 1 and add more to taste.)
2 tsp - salt
1/2 tsp - powdered oregano
1 tsp - powdered cumin

Equipment:
1 - mixing bowl
1 - cheese grater
knife, cutting board, etc...

Cooking:
  • Start by juicing the lime into a salad bowl.
  • Use a cheese grater to grate the tomato and onion into pulp and add to the lime juice.
  • Mix in the salt, garlic and spices
  • Once the other ingrediants are all mixed together, prepare the avecados. (Make sure to wait, because you want to add them to the lime juice mixture as soon as they are cut. This will keep them from browning.)
  • Dicing an avecado:
  • slice into one side of the avecado until the knife hits the pit.
  • Holding the knife still, rotate the avecado slowly, letting the knife cut it in half around the pit.
  • Once it has been sliced, hold the two sides and twist them apart, like opening a jar. The avecado should come into two pieces, with the pit stuck in one side.
  • Place the side with the pit on your cutting board, pit up, and chop into the pit with your knife.
  • The blade should get stuck. You can now use it as a handle to twist out the pit.
  • Leaving the avecado in the shell, make slices about 1/4 inch apart, all the way across the flesh, penetrating down until the tip of the knife touches the inside of the shell but doesn't cut through it, then switch and do the same thing, perpendicular to the first lines.
  • Once you have diced the flesh, use a spoon to scoop it out into the lime mixutre.
  • You can mash it all together if that makes you feel better, but I think it is way better to just stir it together well (which will do some mashing) and leave the chunks how they are.
  • Unlike the salsas, guacamole should be used right after you make it.
  • If you need to prepare it ahead of time, make sure to store it in a zip lock bag with all of the extra air squeezed out. It also helps to save the pits, and put them in the guacamole. Beleive it or not the pits actually do help slow the browning.

You will note that none of these recipes have any cilantro in them, even though it would be in all of these dishes traditionally. There is a simple explanation for that. I hate cilantro. If you are a fan of that wretched herb, feel free to chop up 3 or 4 sprigs and mix it in to any of the above. I am sure you will enjoy it. I, however, will pass. Thank you.

Wednesday, April 8, 2009

Cinco De Mayo

I absolutely adore Hispanic culture, particularly Central American. I love the language, I love the art, I love the style and I LOVE the food. I think one of the most interesting things about any culture is seeing how all of the different aspects of that culture mix to create an identity. The families breed the politicians and revolutionaries. The politicians and revolutionaries inspire the artists (or are the artists.) The food appears in the art and on the tables and feeds the families. This interaction seems to be so much more obvious in Hispanic cultures and I find it fascinating.

Of course if I love cooking as much as I do and I love Central and South American food as much as I do, it only makes sense that Cinco De Mayo is one of my favorite holidays. It also happens to be right around the corner. I try to have an epic tex-mex feast, on Cinco De Mayo, every year(and on as many other days of the year as I can fit it in.) So today, I had the idea to post all the recipes you will need for such a feast, in one big post.

The problem here, is that I very rarely use a recipe for anything and when I make things up, I rarely take notes. So instead of sitting down and writing out a normal post, I have spent pretty much this whole day remembering and writing out the recipes for all of my favorite tex-mex dishes. I also noticed that this is going to be a truly monstrous post if I put it all together. My solution is to make several posts, over the course of the next few weeks, each with a few recipes. This way you can have time to look through them and decide which ones you want to try, in time to get ingredients and cook your very own Cinco De Mayo feast!

Tuesday, March 31, 2009

The Apartment Pizza!

Sunday afternoon I was struck with the intense desire to eat mass quantities of pizza. Now I don't get into snotty vegan trash talking, so I wont talk about the locations themselves, but I will say that the vegan pizza options in Philly are good only because they are vegan. They do not satisfy my cravings for serious pizza. It probably has something to do with the fact that I think that the pizza in 90% of this country is terrible and not worth paying for. This post is not so much about sharing a recipe as it is about sharing an adventure.

I already had some left over fra diavlo sauce from last week, so that was all the push I needed. I set off in the gorgeous Sunday sun, in search of ingredients. A stop at some Italian Market veggie stands, whole foods and a pizza place that has decent crust, yeilded marinated artichoke hearts, spicy olives, zucchini, red onions, fresh raw dough and Follow Your Heart soy cheese(I know that I talk a mean game about not wasting money on pre-packaged foods, but this stuff is awesome and totally worth shelling out a little extra cash for.) I then headed right home and got to work. All told I spent maybe $20 on ingredients for two huge gourmet pizzas.

You will notice that I bought dough from a pizzeria, instead of making my own. Not all pizzerias will sell raw dough, but some will. Having a good relationship with the owner certainly helps. Most of the time I do make my own dough, but I was more interested in spending the afternoon walking around in the sun, then fussing with dough. If you want to take a shot at making your own, I use Peter Reinhart's recipe from his book, The Bread Baker's Apprentice that I found in the 101 Cookbooks Blog

First I stretched the dough out and set it in sheet pans, which I then covered with a damp towel to rise a bit. I prefer a pan style pizza. I like how the edge crust rises up nice, and the under crust is crispy. My face is covered in this picture, not because I care that anyone knows what I look like, but because I look like a total goon. It is a good picture of dough stretching though.


To stretch dough:
  • Start by spreading a healthy layer of flour on your counter.
  • Put your dough ball on the counter and use your palms to press it down into a flat disk. I find it best to use a slight turning motion while pressing repeatedly.
  • Once the ball is a disc, make a sign languace C with both hands, laying the dough over the back of your knuckles.
  • begin rotating the dough and stretching it slightly by skooting your hands back and forth. Most of the stretching should come from the weight of the dough, not from your movement. Be careful to keep your hands towards the edge, or the center will get too thin.
  • If you use rectangular pans like I do, stretch the dough until it overlaps the narrower sides of the pan by about an inch on each side, and then man handle it a little to make it fit the rectangular shape.
  • Make sure that the pan is greased with vegetable oil before you put the crust in it.

Once the dough was stretched, I set too prepping all of my ingredients. There are very few things in this world that I am anal about. Food prep is one of them. Clockwise starting with the plate, we have Follow Your Heart cheese, red onion, thin sliced zuchini, spicy olives and marinated artichoke hearts. Not pictured is veggie burger crumble, which I kept in the freezer.


Once the the dough had set for about 20 minutes, I got it ready to hop in the oven. I made two pies:

One White -
Crust smeared with:
1/2 head of garlic, 1 tbsp olive oil and the ends of the soy cheese that got too small to safely grate. Put all ingredients in a food processor or blender and puree into a paste.

Topped with:
Marinated artichoke hearts, cut into 8ths, thinly sliced zucchini (I used a veggie peeler to keep my slices thin and consistent) red onions and soy cheese.

One Red -
Crust smeared with: Left over Fra Diavlo sauce, but any left over pasta sauce would work ok (as long as you made it your self.)
Topped with: Veggie burger crumbles, spicy olives and soy cheese.

The red pie waiting on deck


Baking the pies:
  • Pizza LOVES a very hot oven. I usually bake pies at 550 degrees, which is as hot as most conventional ovens will go.
  • If you have a pizza stone, take out your oven racks and place the stone on the bottom for gas ovens. For electric ovens, put your stone on the lowest rack.
  • Start your pies in the sheet pan, and leave your oven light on, you will need to watch them pretty closely. As the pies grow bubbles, reach in and pop them with a knife or pizza cutter, so you don't end up with a mutant pizza.
  • Check the pie every few minutes by lifting a corner slightly with a spatula. When the crust is firm enough that the pie starts to lift out, instead of just bending the corner, slip the pie out of the pan and let it finish just sitting on the rack or stone.
  • Your pie is done when the outer crust has a nice golden brown color.

The white pie just about firm enough to come out of the pan and finish baking.


A plate of amazing


A first person view of the best moment of my year.


Thursday, March 26, 2009

Usin' The Sauce.

Something you will notice in a hurry about most of those sauce recipes, is that they make a whole lot of sauce. The reason for that is simple, I freaking love any and all(vegan) tomato sauce. I suppose there are also some other reasons:
  1. Sauce not only holds really well in the fridge, and for months in the freezer, but it is actually better a few days after you made it.
  2. I often make a few pounds of pasta along with the sauce, and then portion that out into sandwich bags, and have work lunches (or lazy dinners) for the week.
  3. In addition to being a great leftover in it's own right, sauce is a great ingredient. I often add it to other recipes to cut down on the cooking time that using fresh tomatoes would add.
It's reason number 3 that I am going to talk about today, and probably in my next post or two. What can I say, when I get Italian food on the brain, it is hard to think of anything else.

I hit snooze far too many times this morning, got ready in a hurry, stepped out the door to walk the dog and instantly realized that this is a soup day. The sky is gray and overcast, it is chilly but not freezing and there is a heavy mist in the air, that gets you wet but won't quite become rain. It is just the kind of day when I want to sit inside watch dvds and eat soup. I may have to go to work, so sitting on my couch and watching movies all day is out, but soup is definitely still on the radar for dinner. Since I still have a little sauce left from that batch that prompted the last entry and I always have veggie stock on hand, so I have got a pretty good head start on a pot of Pasta fagioli (say it with me, "Pasta Fah-zool.") This is easily my favorite soup ever.

Pasta Fagioli
Like a lot of other Italian dishes, if you asked a hundred different grandmas, you would get a hundred different recipes. The things that these recipes always share are small white beans and short cut pasta. Most recipes also include a tomato broth, but not all. Some also have other veggies mixed in. I make what is pretty much the standard version, Cannelinni Beans, Ditalini pasta and tomato broth.

Ingredients:
5 - cups of veggie stock
2 - cups of left over sauce (I like to use Fra Diavolo for this, but any will work.)
1 Tbsp - olive oil
3 - stalks of celery finely diced
1 - carrot finely diced
1 - small onion finely diced
1 - 15 fl oz can of Cannelinni Beans drained and rinsed
1/2 pound - dry Ditalini pasta

Equipment:
1 - large stock pot
1 - med soup pot
1 - strainer
knife, cutting board, etc...


Cooking:
  • The first thing you need to do is make a decision, do you want to eat soup, or a thick pasta dish. If soup is what you are looking for, you should start by cooking the Ditalini according to the directions on the package and keep it separate. If you want a thick pasta dish, you can just add the pasta to the soup while it is cooking.
  • Put your celery, carrots, onions and oil in the large pot over medium high heat. Saute until the onions and celery become translucent and the carrots soften.
  • Add the beans, stock and sauce and turn the heat up to high.
  • Stir regularly until the pot boils.
  • If you are looking for soup (and already cooked your pasta) you are done. Just add the pasta to the pot and serve.
  • If you are looking for a thicker pasta dish (and haven't cooked your pasta yet) add the raw pasta to the pot. Continue stirring regularly until the pasta is cooked through. This will soak up a lot of your broth and make a thicker stew like pasta dish.

Tuesday, March 24, 2009

Il mio cibo preferito è il tipo vegano.

I may not be Italian, but I grew up in an EXTREMELY Italian part of New York state, so my love for Italian fare has roots that stretch back as long as I can remember. While a lot of Italian food is heavy with meat and dairy, the cuisine in general is all about fresh delicious ingredients. Many Italian dishes are vegan already and with just a little adjustment, most Italian dishes can be made vegan while staying tasty and healthy (or becoming even healthier.) I am sure to write about vegan Italian food on a regular basis, but let's start with square one.

Whether you call it Sauce or Gravy or make any of the many variations, tomato sauce is one of the staples of Italian cuisine. It is the center piece of many Italian dishes, and assists in many others. I am sure that is why it has also become so popular in American culture. Unfortunately along with popularity, comes mass production. I won't go so far as to say that all mass produced commercially available tomato sauce is inedible, but I will say that jarred sauces that are even remotely decent are so few, far between, over priced and rarely vegan, that they aren't even worth considering. This is especially true when you consider that delicious home cooked sauce is so freaking easy to make.

My goal for this post, is to start with a basic marinara recipe, and then show how changing just a few things about that recipe can give you some delicious variations.

Marinara Sauce

To Start:
You can make sauce in a hurry if you need to. While cooking, you really only need to bring the pot to a boil, and then let it simmer for 10 or 15 minutes. If you rush your sauce though, the end product is going to suffer. To really develop the delicious flavor of a pot of good sauce, it takes time. This isn't always an option though, when you have a job and other responsibilities, and you can't be bothered to spend 3 hours cooking dinner. I know this just as well as anyone else. My solution? Cook sauce on a day off, and cook enough of it to last you a while. It will freeze fantastically and will also last a good week in the refrigerator. I actually prefer the flavor of sauce a few days after it was originally cooked.

If you are in a hurry and want to eat right away try making Pomodoro, which doesn't need to simmer for nearly as long (more on this later)

Ingredients:
1 - medium yellow onion, minced
6 - cloves garlic (more or less to taste. I tend to use a lot of garlic.) minced
1 Tbsp - Italian seasoning
1 Tbsp - Olive oil
Salt to taste/ health restrictions
1 - 28 oz. can whole peeled tomatoes
1 - 28 oz. can crushed tomatoes
2 Tbsp - tomato paste

Equipment:
1 large sauce pot
1 large(punch type) bowl
knife, cutting board, etc...

Cooking:

  • Put your large pot over med - med high heat, and add the onion, garlic, oil, Italian seasoning and 1 tsp of salt. Saute, stirring regularly, until the onions have become soft and translucent.
  • While the onions, garlic, etc... are sauteing, open both of your cans of tomatoes. The crushed tomatoes are ready to go, so just keep them handy. The whole peeled tomatoes need some work.
  • Empty the can of whole peeled tomatoes(and all the liquid) into your large bowl and sort through them to remove any stems or bits of skin that are left stuck to the stem end of the tomatoes.
  • Once you have cleaned out all of the undesirables, loosely crush the tomatoes by squeezing them in your fist. The idea here is to just break them up a little, not to totally pulverize them.
  • Once your onions are done simmering, add both the cans of tomatoes and turn the heat up to high. Stir the pot constantly until it comes to a boil.
  • When the sauce comes to a boil add the tomato paste stir it in well and turn the heat back down. The idea is to turn the heat down until the sauce just simmering.
  • From this point it's all time and patience. Ideally the sauce should simmer for 3 - 4 hours, stirring occasionally, the longer the better. If you are lucky enough to have a crock pot or slow cooker, go ahead and transfer the sauce into that, set it to medium low and let it go.
  • Just before I am finished cooking, I adjust the salt. Unless you prefer very little salt in your food, the 1 tsp that we added to the sauté is probably not enough. I like to wait until now to add more salt because the pot will reduce quite a bit as it simmers, and it is easy to have it go from tasty to over salty, if you add the salt early and then simmer for a long time.

Variations on a theme

Fra Diavolo
The term Fra Diavolo (litteral translation "Brother of the devil") refers more to a type of sauce than to one specific dish. I have seen it on many different menus in my time and rarely have the dishes been very similar, other than one thing. This sauce is supposed to be SPICY, hence the name. The version that I make is pretty much a spicy pepper filled marinara.

Changes:
  • Instead of dicing your onions, cut them in half once, and then cut them cross wise into thin strips.
  • Add 4 Italian Long Hot peppers, also cut into thin strips, to your sauté. If you cant find Italian Long Hots, pretty much any larger medium heat chili pepper will work.

Bolognese (Americanized)
Most Americans think of a thick meaty tomato sauce, when they hear the term Bolognese. While this is not really correct (the actual Italian dish is mostly meat, with just enough tomato and wine to make it a sauce) it sure is tasty. This hearty sauce is great with a hefty pasta that can hold up to it. My favorites are penne, ziti or rigatoni.

Changes:
  • Add 1/4 cup of red wine to your sauté and let it cook for about a minute, just before adding your tomatoes. Whatever kind you have handy is fine, so long as it is not too sweet. Be careful, while most wine wont flash fire like stronger booze does, some will.
    This is also tasty without wine, if you prefer not to use alcohol.
  • let a bag of frozen veggie burger crumbles thaw, while your sauce simmers and mix it into your sauce during the last 15 minutes of cooking.

Pomodoro
Pomodoro is a fresh fragrant tomato sauce that pairs well with light pastas, like angel hair. It is traditionally made with fresh tomatoes, but you can get away with using canned if you like.

Changes:
  • This sauce tends not to be as good reheated, so I generally make about half as much. Use 1/2 as much onion and garlic, and eliminate the crushed tomatoes, tomato paste and Italian seasoning.
  • If you are feeling adventurous, use 10 fresh plum tomatoes, cut into quarters, instead of the can of whole peeled tomatoes.
  • Once you have sautéed the onion and garlic, add the tomatoes and turn the heat up to high.
  • Once the sauce boils, salt to taste, remove from heat, and mix in about 20 leaves of fresh chopped basil.

Nonna's 10 hour Marinara
Nearly every Italian grandmother I have met has two things in common. 1. She tried to force me to eat something within minutes of meeting her and 2. She has a secret recipe for Marinara sauce so good that it will make you want to cut your tongue out, so it is never again subjected to inferior food. The only thing that I have been able to figure out about these closely guarded secrets, is that they almost always use fresh tomatoes instead of canned, and they have to cook for a hell of a long time. So this is my take on Italian Grandma style sauce.

Changes:
  • Replace the canned tomatoes with about 15 large fresh tomatoes, and 3 cups of water(you will need the extra water to make sure that the tomato is totally cooked, before it igets over thick and burns) and forget about the tomato paste.
  • To prepare the fresh tomatoes you are going to need a large pot of boiling water, and a large bowl of ice water.
  • Remove the stem/core spot at the top of the tomato and cut a very shallow X into the bottom of each tomato. Just deep enough to cut through the skin.
  • Place several tomatoes at a time into the boiling water. You will probably need to do this in 3 or 4 batches.
  • After 30 seconds remove the tomatoes to the bowl of ice water, and leave them there for 5 minutes.
  • Once the tomatoes are totally cooled take them out and peel off the skin, which should now be nice and loose.
  • Once the tomatoes are skinned, they need to be seeded. To do this, cut the tomato in half, perpendicular to the stem and use a butter knife or small spoon to scoop the guts out.
  • After they have been skinned and seeded, they should be diced.
  • This is going to yield a whole lot of tomato. Don't worry, most of that volume is water, which will boil away.
  • Once you have the fresh tomatoes prepped, this recipe is pretty much the same as the original recipe, except that it takes 10 hours. I know that seems absolutely ridiculous, but trust me it is absolutely worth every minute.

Monday, February 23, 2009

Garbage Soup

My Grandma could cook you a 5 course tasting menu, using nothing but dust and cobwebs and you would swear it was made by an Iron Chef. I would imagine that this owes equally to being a child of the depression and then the single mother of a large family. Even though she became much more comfortable financially over the years, there are some habits that she never lost, primarily that the woman does not waste food. Now I don't just mean she eats her leftovers before they spoil, I mean she could give the Native Americans a run for their money with that every part of the Buffalo jazz. There is not a single scrap, clipping, bone, skin, or anything else goes unused in her home.

When I was a kid, I used to poke fun at some of her stranger habits. The one that I remember the most, is Garbage Soup. When making dinner, my grandmother always kept two salad bowls on the counter, one for meat scraps and one for veggie scraps. Everything that was trimmed off of either was saved in the respective salad bowl. I mean everything, cores, skins, stems, everything. When she was cleaning up, she would empty the bowls into matching gallon ziplock bags in her freezer. When these bags got full, she made what I jokingly called garbage soup.

As I have gotten older I have a lot more respect for the whole process. Basically, my grandmother was saving money by making her own veggie and meat stocks, from food that she had already paid for and most people would have just thrown away. This is a skill that she learned because between the depression and being a single mom, she never had any other option. Having grown up under much easier circumstances, skills like this are something that my generation (and those after it) for the most part totally lack. For most of us, that isn't a problem. We just go out and buy whatever we need to eat. Most people I know would not even buy veggie stock (let alone make it,) because that means actually cooking from scratch which is something that is becoming more and more rare in the age of box mixes, canned stew and microwave dinners. Everyone would really be doing themselves a service to try and learn to not only make meals from scratch, but to make ingredients from scratch. For vegans, I think that it is essential.
I am sure to revisit this topic in future posts, but today lets just talk about veggie stock (I obviously don't care to make meat stock.)

Home Made Veggie Stock
The recipe here is going to involve mainly just process instructions, since the ingredients just end up being whatever you have left over.

To start
Get yourself a big airtight container, to keep in the freezer. I usually just use a gallon size ziplock bag. Every time you cut up a vegetable put all your scraps in the freezer. I seriously save everything, from carrot peels to broccoli stems. I once accidentally saved a whole bunch of cerano chile cores and ginger scraps from a Thai meal. The resulting broth was so spicy and delicious, that I now make it a point to try and get some pepper cores and ginger into every batch. You might want to skip the pepper cores if you don't like spice, but it is important to try and get a variety of veggies in there. It will make your end product a lot tastier, and it is also a good way to remind yourself to eat a variety of veggies, which is super important if you don't want a vitamin deficiency.

Ingredients:
1 - gallon bag of vegetable scraps
A heck of a lot of water
salt and seasoning to taste

Equipment:
The largest sauce pot you have
A large open container, like another sauce pot or a big salad bowl
A pasta strainer
A Clean dish towel (paper towels don't work)

Cooking:
  • Put all the scraps in your pot, and put it on your stove over high heat until boiling.
  • The idea here, is to just let it boil away. Every time the liquid in the pot reduces by a quarter, fill it back up to the top. Keep doing this until the liquid in the pot is the color of a glass of iced tea, then remove it from the heat. (I like to use a ladle to pour some into a clear glass so I can peek at the color.) This will probably take a few hours.
  • Once the pot cools, line the strainer with the clean dish towel, and pour the broth slowly through it, collecting the liquid in your large container.
  • all of the solid veggie scraps should now be all gross and mushy. There is really no nutritional value left to them. Throw them in your trash or compost, or feed them to a pet.
  • Put the liquid back in the pot and bring it back up to a simmer.
  • This is when you are going to add your other flavors. I like to wait until the broth is reduced, because it is really easy to over flavor, since any flavors that you add are going to become more potent as it reduces.
  • I always add salt (a little bit at a time until it tastes right) and usually about 1 tbsp of Italian seasoning, you can use whatever spices you like though, and I often change it up depending on what I plan to use the broth for. Or if I am not sure, I just don't add any seasoning at all and I worry about the spice later when I am actually cooking.
  • Whatever the case, add your spices, simmer for 5 minutes, and then remove from the heat.
  • I usually get somewhere in the neighborhood of 1/2 gallon of stock out of this recipe. It will differ from batch to batch though, so don't get to worked up if you end up with more or less.

This stock doesn't have any preservatives in it, so it won't last more than a few days in the fridge. Either make it and use it right away, or freeze it in a sealed container In the freezer, it will last about 3 months.

Friday, February 20, 2009

The Apartment Vegan: A Manifesto

This being my first post, I figure I should start with a bit of a manifesto. Why the hell do I think that I know anything that anyone else cares to read? I suppose the whole point of this blog is that I would like to put information out there that I wish was easily available when I was first starting out as a vegan. There is a huge misconception that vegan food is boring and expensive, and that isn't at all true. Pre-packaged store bought vegan food is boring and expensive, but then again so is pre-packaged store bought omnivore food. Learning to cook your own vegan food is something that every vegan needs to do. Surprising few newly adopted vegans actually know how to cook for themselves already.

My plan is to try and share all of the useful tidbits of information that I had to learn the hard way, in hopes that it will help some other people make the choice to go vegan, or that it might make it easier on those who are first starting out. Trust me, I know how hard it can be, but I also know how easy it can be once you get the hang of it. I hope to share that with anyone who stumbles across this. Also, I really love food and want to talk about it as much as possible and I happen to be a vegan.

If you are looking for a vegan-blog full of wheat grass shots, broiled nut seed shell fiber loaf, and other such uber health conscious dribble, this is probably not the blog for you. That is not to say that I don't try to be healthy. I like staying fit just as much as the next guy and veganism is definitely a great way to lean in that direction. The thing is, I like food that tastes good. If there is a better tasting, but less healthy option, that is still vegan, I am probably going to use it. Being health conscious had absolutely nothing to do with my choice to go vegan, that was entirely based on my personal ethics.

Speaking of ethics, you are also pretty unlikely to hear me go on a rant about the plight of the animals and how meat eaters are murderers. Of course I don't think it is right to contribute to death and suffering, just to satisfy my hunger. The thing is, I don't think that it does anyone any good to walk around screaming, yelling, and tormenting people with pictures of slaughtered cows. In my opinion all that does is draw a clear line to separate the vegan and non-vegan camps. It paints the picture of the crazy vegan who only cares about animals and will do terrible things to you and your family if you disagree. When we make people scared of us, they stop listening to us. When we make people think we are crazy, they don't trust what we say.

My theory on reaching out to omnivores is this. Why don't we stop focusing on what is so horrible about their lifestyle, and trying to brow beat them into converting and just show them what is so great about our lifestyle. Being a vegan is awesome! Once more people see the good things about veganism and stop focusing on this misconception that all vegans are crazy people who are waiting in the shadows with cans of red paint to throw on their fur coats, they might just start listening to us.

That is probably the last paragraph you will read about my ethics (in this blog at least.) Like I said, this whole project isn't about sharing or showing off my morals. This is about me loving food. I love to buy food, I love to cook food, and I LOVE to eat food. Luckily for me I have crossed paths with some amazing people in my time as a vegan and have learned a lot about not just vegan cooking, but cooking in general. This has made it possible for me to eat delicious vegan food on a regular basis, even though I live on a relatively slim budget.

When I first became a vegan, I noticed one huge problem with almost every vegan cookbook that I came across (and trust me, after 12 years of Christmas' and Birthdays, I have about every vegan cook book imaginable) and that is that most all of the recipes rely on hard to find(and often expensive) ingredients. I don't want to have to make a weekly stop at the health food store, just to be able to cook dinner every night. I want to go to the little grocery on the corner of my block, just like everyone else, buy some food and then go home and cook. There are the rare occasions when I agree that there are uses for these exotic substitutes that so many vegan recipes rely on, but I think that should be the exception to the rule. So shortly after I became a vegan, I stopped reading vegan cookbooks and started spending a lot of time in the kitchen. Having an aunt and a brother who are both amazing chefs and endless sources of culinary knowledge has certainly helped me a lot along the way as have the countless other vegans that I have met over the years both in real life and via blogs and message boards.

Something I have always wanted to do was to write a vegan cook book that didn't rely on substitutes and just focused on making good vegan food with ingredients that are readily available. In my head I always called it The Apartment Vegan. I am hoping that this blog is a step in that direction.